![]() Before you start installing Red hat Linux, You should know the pre-requisites for the same i.e. the system requirements
Before you start installing Red hat Linux, You should know the pre-requisites for the same i.e. the system requirements
System Requirement for Red Hat Linux 5
| Parameters | Requirements |
| CPU Type | Pentium 4 or higher, 2GHz or higher |
| Memory/RAM | 1 GB minimum, upto the system limit |
| Hard Disk | 4 GB minimum |
Follow the screenshots to install Red Hat Linux 5
Insert the RHEL DVD into the machine and boot from it. The below page which you see is the first which comes on the screen.
This is the prompt which can be used to
- Install using GUI (Graphics Mode)
- Install using CLI (Text Mode)
- Upgrade your RHEL version
- Boot into Rescue Mode
Hit Enter and by default installation will begin using GUI setup

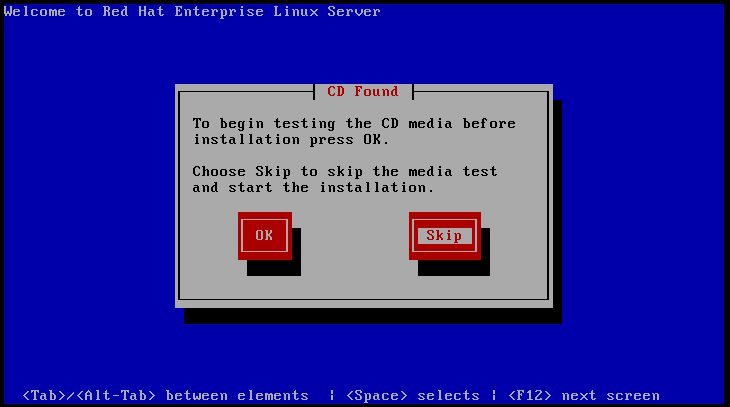
The next screen prompts you to verify the content of the DVD used. If you believe the DVD you are using is correct and not corrupt, you can skip this step as I did
As you see in the next step anaconda installer starts which is used to install Red Hat Linux and many other similar OS like Fedora, CentOS

Click Next to start the installation
Select the preferred Language for installation, as for me it is English

Select the keyboard Language you are using on your machine. (For most by default it is US or US International)

If you have a authorized installation no. provided by Red Hat, you can enter in the below shown box. As of now I don't have any such key so I will skip this step

Click YES to format the hard disk

Using the drop down arrow as shown below you can select the available options for creating partitions

As of now I will go with the "Create custom layout" option

The next screen shows you the available space on the disk along with any other available partitions. In my case I am installing on a fresh machine so it shows all the space as free.
Click on New to create partition

Create /boot partition as shown below. The maximum expected boot size is not more than 200-300 MB. So you can give space accordingly

Now again select New and create a LVM partition of all the available hard disk as shown below. Select the options as shown in RED

Select LVM option

Now a new window will pop up where you can give a Volume Group name as per your requirement.
Next click on Add as shown below to create other LVM partitions such as root, home, var, tmp as per your requirement

Create the required partitions and allocate the space to each partition as shown in below screenshots


Create a swap partition. No mount point required for it. Just select a file system type as swap and allocate the size. For our case 2048 MB


Once done click on Next and move to the next screen

From here there are two methods to configure networking.
- DHCP method
- Static method
For DHCP follow the below screenshot
| Using DHCP |
For static method follow the below screenshots
| Using Static I |
| Using Static II |
Next screen will ask for the region you are installing your server. For me it is INDIA for which I will select Asia/Kolkata as shown below

Provide a password

Select Customize Now to select the list of rpms you want to include at the time of installation

Select the list of packages from the below shown options


Click Next to start the installation

Once the installation is done. Click on reboot to move ahead with the installation process as yet your Linux is not completely installed. Still some initial configuration is pending

Click on Forward

Accept the License and Agreement

You can enable or disable the firewall using the drop down menus. Also you have option to enable selective services through the firewall for your server as shown below

You can choose to enable or disable SELinux

If you want you can enable Kdump by checking the below check box

Set the date and time

In this step you can register your server with RHN so that it can get regular updates for all the patches and bug fixes regularly. As of now we will skip registering, I will show you to do the same from terminal in my next post.

In this step you can create a user(optional)
Since you made changes in SElinux settings, the system will go for a reboot to take the changes affect
After the reboot your system is ready for use
Related Article:
Step by Step CentOS 7 (64 bit) Installation Guide with Screenshots