I have been asked this question multiple times by many users so I guess it is best if I could write a blog on this on different types of network which can be configured inside Virtual Box and most importantly HOW.
What is bridged networking ?
This is for more advanced networking needs such as network simulations and running servers in a guest. When enabled, VirtualBox connects to one of your installed network cards and exchanges network packets directly, circumventing your host operating system's network stack.
Assuming you have CentOS 6 installed on your
Oracle virtual box.
As per my current Network configuration I have a Wireless Router to which I have connected to using my laptop.
Router Subnet: 192.168.0.0/24
Router Gateway: 192.168.0.1
Open Virtual Box
Click on "Machine" and Next select "Settings"
Select "Network" and choose different options as shown below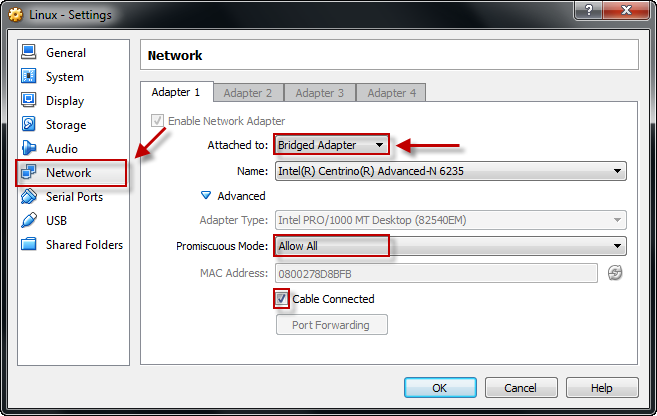
What is promiscuous mode?
A lot can be written about this mode but to be very specific and simple promiscuous mode is a mode of operation in which every data packet transmitted can be received and read by a network adapter.
But anyhow this should be supported by network adapter and is mostly used for network monitoring purpose.
Click "OK" and save the configuration
Next go to the terminal of your Linux console. Here you need to configure your IP Address with the same subnet as of your Router. In a bridged network the VM inside the virtual box will act as a physical machine on the same LAN to which you can provide a static IP.
Alternatively you can also configure DHCP here but this will work only if your Router is configured as DHCP server.
To configure static ip address
# vi /etc/sysconfig/network-scripts/ifcfg-eth1
DEVICE="eth1"
NM_CONTROLLED=no
ONBOOT=yes
HWADDR=08:00:27:8d:8b:fb
TYPE=Ethernet
BOOTPROTO=none
IPADDR=192.168.0.8
PREFIX=24
GATEWAY=192.168.0.1
DNS1=8.8.8.8
DEFROUTE=yes
IPV4_FAILURE_FATAL=yes
IPV6INIT=no
NAME="System eth1"
UUID=5fb06bd0-0bb0-7ffb-45f1-d6edd65f3e03
USERCTL=no
PEERDNS=yes
Restart your network services to take the change affect
# /etc/init.d/network restart
Shutting down interface eth1:                              [  OK  ]
Shutting down loopback interface:                          [  OK  ]
Bringing up loopback interface:                            [  OK  ]
Bringing up interface eth1:                                [  OK  ]
To configure DHCP
# vi /etc/sysconfig/network-scripts/ifcfg-eth0
DEVICE="eth1"
NM_CONTROLLED=no
ONBOOT=yes
HWADDR=08:00:27:8d:8b:fb
TYPE=Ethernet
BOOTPROTO=dhcp
PREFIX=24
DEFROUTE=yes
IPV4_FAILURE_FATAL=yes
IPV6INIT=no
NAME="System eth1"
UUID=5fb06bd0-0bb0-7ffb-45f1-d6edd65f3e03
USERCTL=no
PEERDNS=yes
Restart your network services to take the change affect
# service network restart
Shutting down interface eth1:                              [  OK  ]
Shutting down loopback interface:                          [  OK  ]
Bringing up loopback interface:                            [  OK  ]
Bringing up interface eth1:
Determining IP information for eth1... done.
I hope the article was useful.