The important part of networking in the OpenStack cloud is OVS. Open vSwitch is not a part of OpenStack project. However, OVS is used in most implementations of OpenStack clouds. It has also been integrated into many other virtual management systems including OpenQRM, OpenNebula, and oVirt. Open vSwitch can provide support for protocols such as OpenFlow, GRE, VLAN, VXLAN, NetFlow, sFlow, SPAN, RSPAN, and LACP. It can operate in distributed configurations with a central controller.
In my last article I have already shared the steps to bring up a controller and compute setup and install openstack using packstack.
Below steps and screenshots are validated from Red Hat based Openstack platform, but the steps and commands will work also on the opensource Openstack running on any other distribution
Open vSwitch by itself consists of several components:
- openswitch_mod.ko: The module plays the role of ASIC (application-specific integrated circuit) in hardware switches. This module is an engine of traffic processing.
- Daemon ovs-vswitchd : The daemon is in charge of management and logic for data transmitting.
- Daemon ovsdb-server : The daemon is used for the internal database. It also provides RPC (remote procedure call) interfaces to one or more Open vSwitch databases (OVSDBs).
To check the version of openvswitch installed
[root@controller-rhel ~]# ovs-vsctl -V
ovs-vsctl (Open vSwitch) 2.5.0
Compiled Aug 2 2017 11:12:47
DB Schema 7.12.1
Step 1: Configure OVSBridge on the Controller
OpenStack Neutron Services and Their Placement
To do the below changes make sure openvswitch is installed on your setup
# rpm -q openvswitch
Navigate to the path of your interface configuration files
[root@controller-rhel ~]# cd /etc/sysconfig/network-scripts/
Copy the configuration of your eth0 as below (The name of the interface may vary depending upon the environment)
# cp ifcfg-eth0 ifcfg-br-ex
Make the highlighted changes in your ifcfg-br-ex
[root@controller-rhel network-scripts]# cat ifcfg-br-ex
TYPE="OVSBridge"
BOOTPROTO="static"
DEFROUTE="yes"
IPV4_FAILURE_FATAL="no"
IPV6INIT="no"
NAME="br-ex"
UUID="e20b64ec-fc48-4b21-b60f-e110f5380fc3"
DEVICE="br-ex"
DEVICETYPE="ovs"
ONBOOT="yes"
IPADDR="192.168.122.12"
PREFIX="24"
GATEWAY="192.168.122.1"
DNS1="10.43.138.12"
NM_CONTROLLED="no"
Next make the below changes in your ifcfg-eth0 file and remove all the unwanted entries
[root@controller-rhel network-scripts]# cat ifcfg-eth0
TYPE="OVSPort"
BOOTPROTO="static"
DEFROUTE="yes"
IPV6INIT="no"
NAME="eth0"
UUID="e20b64ec-fc48-4b21-b60f-e110f5380fc3"
DEVICE="eth0"
DEVICETYPE="ovs"
OVS_BRIDGE="br-ex"
ONBOOT="yes"
Restart your network services
# systemctl restart network
NOTE: If there is some mistake in the configuration of your network then you may loose connectivity here so you can login to the console of your setup and troubleshoot the configuration files.
Once done validate your new configuration, the IP Address must be now assigned to "br-ex" device instead on eth0
[root@controller-rhel network-scripts]# ip a
1: lo: <LOOPBACK,UP,LOWER_UP> mtu 65536 qdisc noqueue state UNKNOWN qlen 1
    link/loopback 00:00:00:00:00:00 brd 00:00:00:00:00:00
    inet 127.0.0.1/8 scope host lo
       valid_lft forever preferred_lft forever
    inet6 ::1/128 scope host
       valid_lft forever preferred_lft forever
2: eth0: <BROADCAST,MULTICAST,UP,LOWER_UP> mtu 1500 qdisc pfifo_fast master ovs-system state UP qlen 1000
    link/ether 52:54:00:59:bb:98 brd ff:ff:ff:ff:ff:ff
    inet6 fe80::5054:ff:fe59:bb98/64 scope link
       valid_lft forever preferred_lft forever
3: virbr0: <NO-CARRIER,BROADCAST,MULTICAST,UP> mtu 1500 qdisc noqueue state DOWN qlen 1000
    link/ether 52:54:00:63:84:f4 brd ff:ff:ff:ff:ff:ff
    inet 192.168.124.1/24 brd 192.168.124.255 scope global virbr0
       valid_lft forever preferred_lft forever
4: virbr0-nic: <BROADCAST,MULTICAST> mtu 1500 qdisc pfifo_fast master virbr0 state DOWN qlen 1000
    link/ether 52:54:00:63:84:f4 brd ff:ff:ff:ff:ff:ff
5: ovs-system: <BROADCAST,MULTICAST> mtu 1500 qdisc noop state DOWN qlen 1000
    link/ether 82:4c:d5:4b:54:32 brd ff:ff:ff:ff:ff:ff
7: br-int: <BROADCAST,MULTICAST> mtu 1500 qdisc noop state DOWN qlen 1000
    link/ether ba:d0:22:7f:95:4c brd ff:ff:ff:ff:ff:ff
8: br-tun: <BROADCAST,MULTICAST> mtu 1500 qdisc noop state DOWN qlen 1000
    link/ether 82:91:ea:b4:b6:44 brd ff:ff:ff:ff:ff:ff
9: vxlan_sys_4789: <BROADCAST,MULTICAST,UP,LOWER_UP> mtu 65470 qdisc noqueue master ovs-system state UNKNOWN qlen 1000
    link/ether 26:c7:82:58:f7:4a brd ff:ff:ff:ff:ff:ff
    inet6 fe80::24c7:82ff:fe58:f74a/64 scope link
       valid_lft forever preferred_lft forever
10: br-ex: <BROADCAST,MULTICAST,UP,LOWER_UP> mtu 1500 qdisc noqueue state UNKNOWN qlen 1000
    link/ether 2a:e2:56:f0:f3:4c brd ff:ff:ff:ff:ff:ff
    inet 192.168.122.12/24 brd 192.168.122.255 scope global br-ex
       valid_lft forever preferred_lft forever
    inet6 fe80::28e2:56ff:fef0:f34c/64 scope link
       valid_lft forever preferred_lft forever
Validate the bridge connection
[root@controller-rhel ~]# ovs-vsctl show
84045430-57bb-4057-9b6b-d059aaa60c05
    Bridge br-int
        fail_mode: secure
        Port int-br-ex
            Interface int-br-ex
                type: patch
                options: {peer=phy-br-ex}
        Port patch-tun
            Interface patch-tun
                type: patch
                options: {peer=patch-int}
        Port br-int
            Interface br-int
                type: internal
    Bridge br-tun
        fail_mode: secure
        Port patch-int
            Interface patch-int
                type: patch
                options: {peer=patch-tun}
        Port "vxlan-c0a87a0d"
            Interface "vxlan-c0a87a0d"
                type: vxlan
                options: {df_default="true", in_key=flow, local_ip="192.168.122.12", out_key=flow, remote_ip="192.168.122.13"}
        Port br-tun
            Interface br-tun
                type: internal
    Bridge br-ex
        fail_mode: standalone
        Port br-ex
            Interface br-ex
                type: internal
        Port phy-br-ex
            Interface phy-br-ex
                type: patch
                options: {peer=int-br-ex}
        Port "eth0"
            Interface "eth0"
    ovs_version: "2.5.0"
As you can see, three bridges exist:
- Integration bridge (br-int): There is a single integration bridge on each node. This bridge acts as a virtual switch where all virtual network cards from all virtual machines are connected. OVS Neutron agent automatically creates the integration bridge. The integration bridge "br-int", tage and untags VLAN traffic that originated from the instance and traffic destined for the instance
- External bridge (br-ex): This bridge is for interconnection with external networks. In o
- Tunnel bridge (br-tun): This bridge is a virtual switch like br-int . It connects the GRE and VXLAN tunnel endpoints. The tunneling bridge "br-tun" translates the traffic that was received by the integration bridge "br-int" into VXLAN tunnels.
Here is an example of the code from a config file for neutron-openvswitch-agent
[root@controller-rhel ~]# grep -o '^[^#]\*' /etc/neutron/plugins/ml2/openvswitch_agent.ini
[ovs]
integration_bridge = br-int
tunnel_bridge = br-tun
local_ip =192.168.122.12
bridge_mappings =physnet1:br-ex
enable_tunneling=True
[agent]
polling_interval = 2
tunnel_types =vxlan
vxlan_udp_port =4789
l2_population = False
arp_responder = False
prevent_arp_spoofing = True
enable_distributed_routing = False
extensions =
drop_flows_on_start=False
[securitygroup]
firewall_driver = neutron.agent.linux.iptables_firewall.OVSHybridIptablesFirewallDriver
Step 2: Create Internal Network
Now we are ready to create internal network which will be assigned to the instances
Login to your horizon dashboard
Navigate to Project -> Network -> Networks
Click on "Create Network"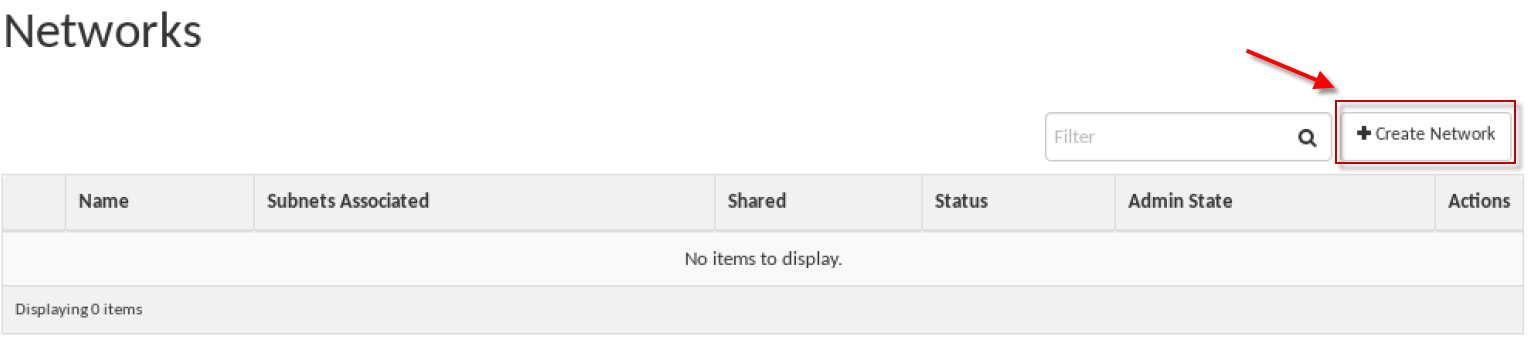
Fill the provided details
Network Name : internal_network
Admin State : UP
Create Subnet : Checked

Click on Next
Subnet Name : int_subnet
Network Address : 192.168.100.0/24
IP Version: IPv4
Gateway IP : 192.168.100.254

Subnet Details
DHCP Enable: Checked
DNS Servers : 10.43.138.12

Click on "Create"
So our network is successfully created as you see below

Step 3: Create External Network
Now we need an external network which can be used as Floating IP to connect to the instance.
IMPORTANT NOTE: Make sure this external network what you intend to use is reachable from your host server. For my case I will use the same subnet as used for my controller and compute setup i.e. 192.168.122.0/24
Login to your horizon dashboard
Navigate to Project -> Network -> Networks Click on "Create Network"
Fill the provided details
Network Name : external_network
Admin State : UP
Create Subnet : Checked
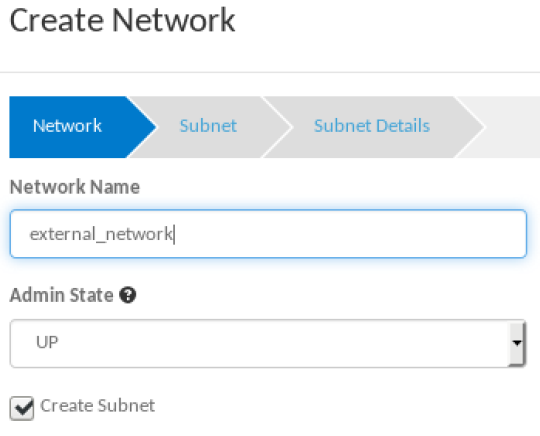
Click on Next
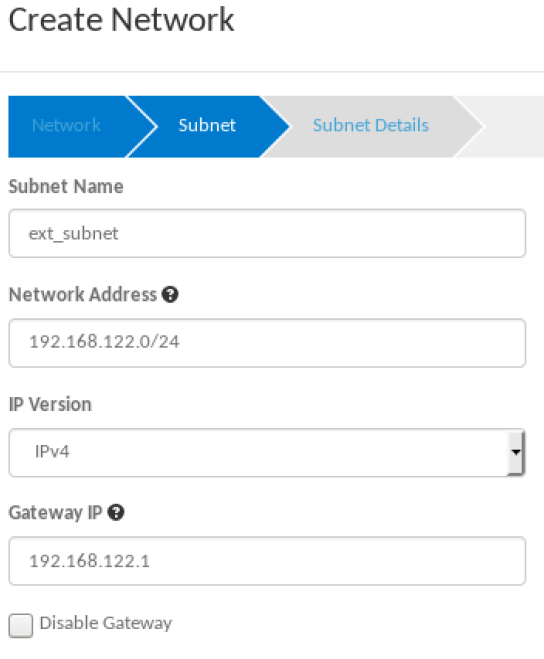
Subnet Name : ext_subnet
Network Address : 192.168.122.0/24
IP Version : IPv4
Gateway IP : 192.168.122.1
Subnet Details
DHCP Enable : Checked
DNS Servers : 10.43.138.12

Click on "Create"
Now our network is created but currently it will work only as internal network unless we explicitly assign it as "external"
So Navigate to Admin -> Networks
Here you will see the list of available networks which we created as shown below
Next select the check box of the "external-network" and click on "Edit Network"
Next select the check box as shown below to make this as external network (public) and click on "Save Changes"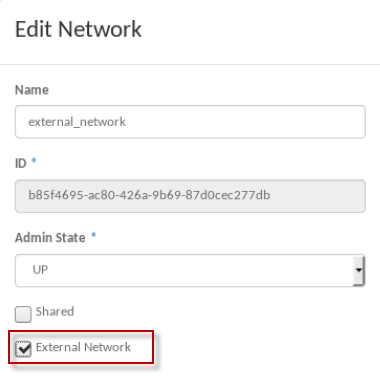
You can also validate this from your CLI
[root@controller-rhel ~(keystone_admin)]# neutron net-list
+--------------------------------------+------------------+-------------------------------------------------------+
| id                                   | name             | subnets                                               |
+--------------------------------------+------------------+-------------------------------------------------------+
| b85f4695-ac80-426a-9b69-87d0cec277db | external_network | 69f78d46-910c-4fb5-a086-812ff4743ec5 192.168.122.0/24 |
| 60be14fb-f28e-40be-a1f7-e09731ce2062 | internal_network | a1d247b9-6db3-43ca-a6af-b2ade51e80bc 192.168.100.0/24 |
+--------------------------------------+------------------+-------------------------------------------------------+
To get more details about the network we created
[root@controller-rhel ~(keystone_admin)]# neutron net-show external_network
+---------------------------+--------------------------------------+
| Field                     | Value                                |
+---------------------------+--------------------------------------+
| admin_state_up            | True                                 |
| id                        | b85f4695-ac80-426a-9b69-87d0cec277db |
| mtu                       | 0                                    |
| name                      | external_network                     |
| provider:network_type     | vxlan                                |
| provider:physical_network |                                      |
| provider:segmentation_id  | 50                                   |
| router:external           | True                                 |
| shared                    | False                                |
| status                    | ACTIVE                               |
| subnets                   | 69f78d46-910c-4fb5-a086-812ff4743ec5 |
| tenant_id                 | dbb0e4e20f874acd85cbc7927517390a     |
+---------------------------+--------------------------------------+
Now the internal network
[root@controller-rhel ~(keystone_admin)]# neutron net-show internal_network
+---------------------------+--------------------------------------+
| Field                     | Value                                |
+---------------------------+--------------------------------------+
| admin_state_up            | True                                 |
| id                        | 60be14fb-f28e-40be-a1f7-e09731ce2062 |
| mtu                       | 0                                    |
| name                      | internal_network                     |
| provider:network_type     | vxlan                                |
| provider:physical_network |                                      |
| provider:segmentation_id  | 80                                   |
| router:external           | False                                |
| shared                    | False                                |
| status                    | ACTIVE                               |
| subnets                   | a1d247b9-6db3-43ca-a6af-b2ade51e80bc |
| tenant_id                 | dbb0e4e20f874acd85cbc7927517390a     |
+---------------------------+--------------------------------------+
Step 4: Create Routers
Whether using IPv4 or Ipv6, network traffic needs to move from host to host and network to network. Each host has a routing table, which tells it how to route traffic for particular networks. The routing table entries will list a destination network, which interface to send out the traffic out, and the IP address of any intermediate router that is required to relay the message to its final destination. The routing table entry which matches the destination of the network traffic is used to route it. If two entries match, the one with the longest prefix is used.
In order for instance to communicate with any external subnet, a router must be deployed. red Hat Openstack platform provides routing by using an SDN- based virtual router. Similar to physulcal routers, SDN-based virtual routers require one subnet per interface. Traffic received by the router use the router's default gateway as the next hop. The default gateway uses a virtual bridge to route the traffic to an external network. Each router has many interfaces that conncet to subnets and one gateway that connects to a network.
To create a router, in Horizon
Navigate to Project -> Network -> Routers
Click on "Create Router"
Provide the below details
Router name : test-router
Admin State : UP
External Network : external_network (Select the public network which you created above at step 3)

And click on "Create Router"
Next click on the router name i.e. "test-router" for us
It will show you the router details under "Overview"
Navigate to "Interfaces" TAB and click on "Add Interface"

Next select the internal network which we created from the drop down menu for "Subnet"
You can leave the IP Address section blank as we have enabled DHCP so the IP Address will be automatically allocated to us.
Once done click on "Add Interface"
We are done with our Network Setup.
Follow below links for next chapters to continue with the configuration of rest of the services in Openstack
Part 4: How to create, launch and connect to an instance from scratch in Openstack