In my last article I have already covered below topics
In the article I will show you the steps to create all the necessary pre-requisites for creating an instance
Below steps are validated on Red Hat based Openstack Platform but the same commands will work on opensource Openstack, although the image screenshots may differ.
Creating Glance Image
Glance consists of two services that are implemented as GNU/Linux daemons:
- glance-api: Accepts Image REST API calls for image discovery, retrieval, and storage.
- glance-registry: Stores, processes, and retrieves metadata about images. For example, metadata are size, type, owner, etc. external services never touches glance-registry directly.
Below are the links for the repository for various images which you can plan and use for your setup.
| OpenStack Distribution | Web Site Link |
| Red Hat OpenStack Platform (60-day trial) | https://www.redhat.com/en/insights/openstack |
| RDO by Red Hat | https://www.rdoproject.org/ |
| Mirantis OpenStack | https://www.mirantis.com/products/mirantis-openstacksoftware/ |
| Ubuntu OpenStack | http://www.ubuntu.com/cloud/openstack |
| SUSE OpenStack Cloud (60-day trial) | https://www.suse.com/products/suse-openstack-cloud/ |
For this article I will download a qcow2 image of CentOS
[root@openstack ~]# wget http://cloud.centos.org/centos/7/images/CentOS-7-x86_64-GenericCloud-1805.qcow2
This will download the CentOS-7 image on my setup. Make sure you download this on your host server as your controller will try to search for the image on its base machine.
For the sake of this article I will change the root password of this image
# virt-customize -a /tmp/CentOS-7-x86_64-GenericCloud-20141129_01.qcow2 --root-password password:redhat
[   0.0] Examining the guest ...
[  34.9] Setting a random seed
[  34.9] Setting passwords
[  47.6] Finishing off
This will change the password of the root user in the image to "redhat"
Next login to your Horizon dashboard
Navigate to Project -> Compute -> Images -> Create Image
Now follow the instructions on the screen
Name : CentOS7
Image Source : Image File
Browse : Locate the image from your setup
Format : QCOW2
Architecture : x86_64

Next click on "Create Image"
You can validate the image which you just created on your controller node at the below location
[root@controller-rhel ~]# cd /var/lib/glance/images/
[root@controller-rhel images]# ls -l
total 965892
-rw-r-----. 1 glance glance 989069312 Jul  8 13:02 eb1c248f-aade-426b-adde-012c8de98521
Or you can use below command
[root@controller-rhel ~(keystone_admin)]# openstack image list
+--------------------------------------+---------+
| ID                                   | Name    |
+--------------------------------------+---------+
| eb1c248f-aade-426b-adde-012c8de98521 | CentOS7 |
+--------------------------------------+---------+
To get the details of the image
[root@openstack ~]# qemu-img info /tmp/CentOS-7-x86_64-GenericCloud-20141129_01.qcow2
image: /tmp/CentOS-7-x86_64-GenericCloud-20141129_01.qcow2
file format: qcow2
virtual size: 8.0G (8589934592 bytes)
disk size: 943M
cluster_size: 65536
Format specific information:
    compat: 0.10
Disk formats supported by Glance
Create Volumes
We have used block-storage (Cinder) as our backend type for creating Volumes. We can add additional Volumes to the Instances which we create here.
OpenStack block storage service consists of four services implemented as GNU/Linux daemons:
- cinder-api: API service provides an HTTP endpoint for API requests. Currently, two versions of API are supported and required for the cloud. So Cinder provides six endpoints. The cinder-api verifies the identity requirements for an incoming request and after that routes them to the cinder-volume for action through the message broker.
- cinder-scheduler: Scheduler service reads requests from the message queue and selects the optimal storage provider node to create or manage the volume.
- cinder-volume: The service works with a storage back end through the drivers. The cinder-volume gets requests from the scheduler and responds to read and write requests sent to the block storage service to maintain state. You can use several back ends at the same time. For each back end you need one or more dedicated cindervolume service.
- cinder-backup: The backup service works with the backup back end through the driver architecture.
The space for this volume will be allocated using the cinder-volume group which we had created in the first stage of this article as below link
You can use the cinder service-list command to query the status of Cinder services:
[root@controller-rhel ~(keystone_admin)]# cinder service-list
+------------------+--------------------+------+---------+-------+----------------------------+-----------------+
|      Binary      |        Host        | Zone |  Status | State |         Updated_at         | Disabled Reason |
+------------------+--------------------+------+---------+-------+----------------------------+-----------------+
| cinder-scheduler |   controller-rhel   | nova | enabled |   up  | 2018-07-08T08:29:48.000000 |        -        |
|  cinder-volume   | controller-rhel@lvm | nova | enabled |   up  | 2018-07-08T08:29:49.000000 |        -        |
+------------------+--------------------+------+---------+-------+----------------------------+-----------------+
You can check the free size available on your cinder volume on the controller
[root@controller-rhel ~]# vgs
  VG             #PV #LV #SN Attr   VSize    VFree
  cinder-volumes   1   0   0 wz--n- <100.00g <100.00g
  rhel             1   2   0 wz--n-  <38.52g   <7.69g

[root@controller-rhel ~]# pvs
  PV         VG             Fmt  Attr PSize    PFree
  /dev/vda3  rhel           lvm2 a--   <38.52g   <7.69g
  /dev/vdb1  cinder-volumes lvm2 a--  <100.00g <100.00g
As you see I have create a cinder-volume VG with 100GB of storage so I can create volumes till this limit is reached.
To create a "Volume"
Navigate to Project -> Volumes -> "Create Volume"
Fill in the details as requested on the screen
Volume Name : 40GB_volume
Volume Source : No source
Type : iscsi
Size : 40GB
Availability Zone : Nova
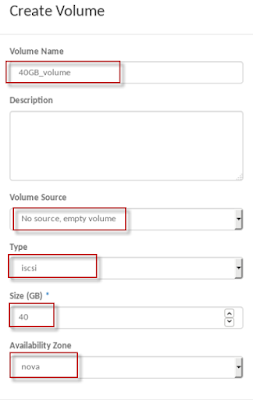
Click on "Create Volume"
So now our volume is successfully created
You can also validate the colume by using below command on the controller
[root@controller-rhel ~(keystone_admin)]# openstack volume list
+--------------------------------------+--------------+-----------+------+-------------+
| ID                                   | Display Name | Status    | Size | Attached to |
+--------------------------------------+--------------+-----------+------+-------------+
| 60067a3c-1b56-420e-8130-3174cf571574 | 40GB_volume  | available |   40 |             |
+--------------------------------------+--------------+-----------+------+-------------+
Create Flavors
Flavors here are the resource templates, which determine the instance's size for RAM, disk and capacity for number of cores. Flavors can also specify secondary ephemeral storage, swap disk, metadata to restrict usage or special project access. The default install of Openstack provides five flavors. However there are use cases, like changing default memory and capacity to suit the underlying hardware needs or changing or adding metadata to force specific I/O rate for the instance, that may need to create and manage specialized flavors.
Default Flavors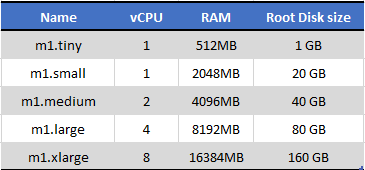
NOTE: Creation of flavors is done by "admin" user, but may be delegated to other users by redefining the access controls. To allow all users to configure flavors, specify the policy in the "/etc/nova/policy.json" file
[root@controller-rhel ~]# grep flavormanage /etc/nova/policy.json
    "compute_extension:flavormanage": "rule:admin_api",
To create a flavor
Navigate to Admin -> System -> Flavors -> Create Flavor
Fill in the required details
Name : m1.test
ID : auto
VCPUs : 4
RAM : 4096MB
Root Disk : 40GB
Ephemeral Disk : 10GB
Swap Disk : 1024MB

Click on "Create Flavor"
Managing Key Pairs
SSH keys are a secured, trusted way of connecting to remote servers via the SSH protocol without using passwords. SSH keys always come in pairs: private key and a public key. On Linux systems, the private key is usually stored in ~/.ssh/id_KEY_TYPE and the public key under ~/.ssh/id_KEY_TYPE.pub. KEY_TYPE being the encryption algorithm such as RSA or DSA.
The type of encryption most often used by default is RSA, so the keys would be named id_rsa and id_rsa.pub. While the public key is meant to be shared or sent to remote servers freely (in the ~/.ssh/authorized_keys file), the private key should be secured on the local machine with strict rule access.
Openstack gives users the ability to generate and import existing key pairs; upon generation, while the public key is stored in the database, the private key is not stored, as accessing the database would compromise the integrity as well as the security of the keys.
To create a key pair
Login to the Horizon Dashboard
Navigate to Project -> Access & Security -> Key Pairs -> Create Key Pair
Give a name to your key pair, I am giving "test", click on Next
It will ask you to download the key pair on your controller node, save it under Downloads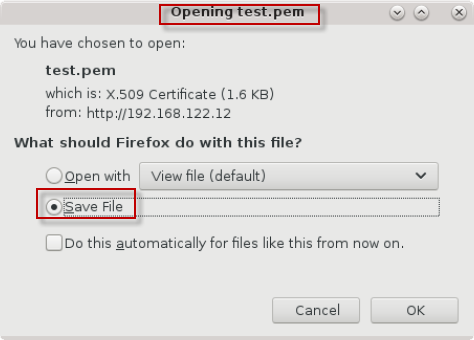
Once a key pair is generated, users can use it against an instance to connect to it. If a public key is imported, Nova will store it in its database and would expect users to possess the private key the public key is dependent on.
IMPORTANT NOTE: Depending on how the image is configured, it might not be possible to connect to the instance without a valid key pair.
To view the key pair using CLI
[root@controller-rhel ~(keystone_admin)]# nova keypair-list
+------+-------------------------------------------------+
| Name | Fingerprint                                     |
+------+-------------------------------------------------+
| test | a5:ed:65:bd:dd:24:d0:af:12:1a:8f:b2:6e:f7:82:51 |
+------+-------------------------------------------------+
Follow below links for next chapters to continue with the configuration of rest of the services in Openstack
Part 4: How to create, launch and connect to an instance from scratch in Openstack