Below list of topics are covered in this article
- Create an Instance
- Associate Floating IP to the Instance
- Modify Security Group for the Instance
- Connect to the Instance
In my last article I have already covered below topics
Below steps and screenshots are validated from Red Hat based Openstack platform, but the steps and commands will work also on the opensource Openstack running on any other distribution
Create an Instance
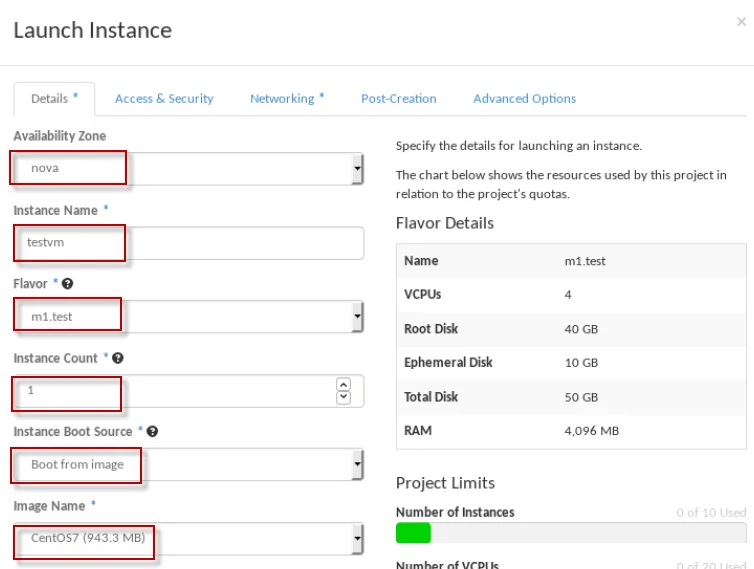
To Launch an Instance, Login to you Horizon Dashboard using the user for which the instance needs to be created. I will use admin user as I have not created any other project for this article.
Login using "admin" to your Horizon DashBoard
Navigate to Project -> Compute -> Instance -> Launch Instance
Fill in the required details
Under Details TAB
Availability Zone : nova
Instance Name : testvm
Flavor : m1.test
Instance Count : 1
Boot Source : Boot from Image
Image Name : CentOS7
Under Access and Security
Key Pair : test
Security Group : default

Under Networking
Selected networks : internal_network

Click on "Launch"
It may take few minutes depending upon your environment for the instance to be up and ready.
Associate Floating IP to the Instance
Since we have not yet generated any floating IP, at this stage it self we will generate and assign one floating IP to my instance
Next select the instance and from the drop down menu as shwon below select "Associate Floating IP"
Click on the "plus" sign to generate a floating IP
Select the external network pool and generate a free floating IP which can be associated to the instance
Now we have a Floating IP with us "192.168.122.4" which we can assign to this instance
Now as you can see floating ip has been assigned to my instance
Modify Security Group for the Instance
We had used the "default" security group for this instance as a part of which by default ICMP and SSH protocols are blocked so we must enable them before we try to connect the instance
To modify the security group
Navigate to Project -> Compute -> Access & Security -> Security Groups -> default
Select the checkbox of default and click on "Manage Rules"
Click on "Add Rule"
From the drop down menu select "Allow ICMP" and "Add"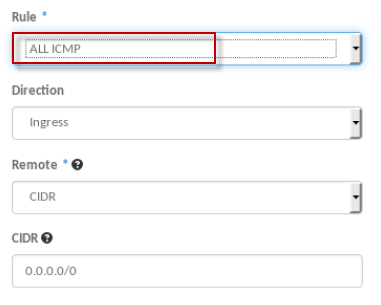
Next again create another rule and select "SSH" and "Add"
Connect to the Instance
NOTE: Make sure the permission on the private key file is 600
[root@openstack ~]# chmod 600 Downloads/test.pem
Next try to connect to the instance
[root@openstack ~]# ssh -i Downloads/test.pem 192.168.122.4
root@192.168.122.4's password:
[root@host-192-168-100-2 ~]#
IMPORTANT NOTE: Since we had changed the password of our image file for root user, we are directly able to login as root. If you have not followed that step then you must login as "centos" user.
So all went well here. I hope the article was useful.
Please let me know your views and feedback in the comment section below.
Follow below links for next chapters to continue with the configuration of rest of the services in Openstack
Part 4: How to create, launch and connect to an instance from scratch in Openstack